![]() |
| 3 heater switches and 3 PIDs on Coffee-Tech FZ-94 front |
Plenty of ControlsEver since
Artisan and the
Coffee-Tech FZ-94 joined forces, a lot of communication and control is already available to roastmasters. Much about the latest options adopted by Coffee-Tech in cooperation with Marko Luther of
Artisan have already been published on the
Artisan blog for everyone to study and implement. Specifically, most details are described on Marko Luther's blog entry
Playing with the CTE lab roaster and the sub-blogs linked there.
Three PIDs, two drivesAll three PIDs on the front panel communicate with Artisan using the MODBUS ring and its USB connector. Furthermore, the two motors inside the roaster are connected over the same medium so one can use sliders in Artisan to speed up or slow down the airflow or drum rotation at every time during the roast process.
![]() |
| Frequency drive controllers, operated from within Artisan |
Software PIDThe built in PID of Artisan can even be instructed to automatically control the airflow in order to refine the execution of a previously successful roast. Since increased airflow causes a stream of room temperature air to mix with the bean mass, this has a 'negative' influence on the roast profile and this way, corrections can be made to deal wth any overshoots in bean temperature.
This has been proven to work but in some cases it leaves room for improvement. For instance, at FC, when a surge of energy comes bursting out of the beans.
One usually wants an increase of airflow around FC to ensure a clear clean taste for the beans and to prevent an overpowering smoky aroma. But if the BT is exactly on target, as anticipated from a previous roast, then the PID will not be increasing the airflow at that phase.
One can accommodate this by entering one or several automatic changes in airflow or switching to different PID settings depending on the roast phase but that opens a door to many tweaks, potentially each necessitating a couple of their own tweaks.
Effective switchesLuckily, the machine's own built in options also work well.
There are three separate ON/OFF switches that each control one element. The tiny symbol below each switch indicates which one it is connected to. From left to right, one two and three correspond to the elements left, middle and right when one is standing at the machine front facing the cooling tray and charge slider / drop door.
DT PID safetyBesides manually allowing the switches to be ON or OFF, the machine's PID monitoring the Drum Temp (DT) also holds a key to switch these. If you use the corresponding slider in Artisan to a target DT that is lower than the measured drum temperature, then manually switching the elements ON does not actually force electric power through the elements. The DT PID only allows the elements to glow when the target DT is higher. In consequence, and this is a nice safety measure, the DT PID also shuts off power to the elements if during the roast the DT is meeting the limit set by the user.
The DT PID activates a big relay in the back of the roaster. When it switches, you hear a big heavy CLUNK and you can see the indicator lights in the three manual switches go OFF if they were enabled ON.
Gradual glowSince each of the 1kW elements, when switched ON, needs some time before it's fully heated and radiating a maximum glow and it also takes some time before an element, once switched off, has given off its stored energy, there is a gradual effect of these switches.
And since it's possible to manually enable each of them separately, the operator has a relatively wide array of options available to steer the roast along a predefined profile. If a first element is switched off about 25 seconds before the expected FC and the airflow is increased, the energy burst at FC is mostly compensated for and from then on, one can increase the airflow further (and/or switch off the other two elements) to direct a continuous decline in Rate of Rise, keeping it above zero until the DROP point.
Could this be improved upon? What if I could have all three elements ON at 85% of power?
Or have an extra PID to autopilot BT along a curve?
Back in the time when I used the little Fracino Roastilino, I had an advanced FUJI PXG-4 PID built inside a box of its own to drive the SSR inside the Roastilino which in turn regulated the heat radiated by the element for the roast chamber. For details about some early
Curve controlled roasts some time ago with Artisan one can check the blog entry about
Coffee Roasting at Home.
Since then, the software PID option of Artisan has also been used by Jan van der Weel, Tije de Jong and me for
another little air roaster and that works very well.
There is only one way to find out. Since the FUJI PXG-4 unit was idling on top of the Roastilino it was not difficult to uncouple the probe and the cables for the SSR (Solid State Relay) and move it closer to the FZ-94.
To provide this external device with a BT reading of its own, I asked Bart Gommers at
TCDIRECT if they could send me a dual probe so I could feed one set of wires from it to the FZ-94 internal BT PID and its twin to the FUJI:
![]() |
| Beat Trier turned into dual BT probe |
Recently, Tije had already added a
BT probe switch to the control panel of the FZ-94 so I could simply switch between measurements of the BT probe in different locations within the bean mass.
Tije also added a set of three SSRs to the control chamber of the FZ-94. He custom made a block of cooling fins for the SSRs in a way that placed the fins directly in the airflow of the fan at the side of the control chamber. He left all original wires and relays in place so no control was lost in the manual switches nor in the safety limit of the DT PID. He also built in the sockets for the banana plugs coming from the FUJI PXG-4 to drive these SSRs.
![]() |
Bottom left in the control chamber, the red and black sockets for the control signal
from the FUJI PXG-4 into the three separate SSRs, each for its own heating element. |
![]() |
| Close up of the three CRYDOM SSRs type CWD2425 240V 25A |
![]() |
| Positioned in (but not blocking off) cooling fan air flow |
![]() |
| Close up view |
Marko's magic
I used a lab power supply to feed a steady 5V to the SSRs while Marko Luther was figuring out how Artisan could best facilitate this new configuration, communicating bidirectionally with one more device, an external one at that with its own USB serial protocol and creating a means to log, display and control all these data flows.
Then, Marko sent me a full set of instructions and even a custom made configuration file for my Artisan installation.
And the fun could begin for real: auto-tuneOne of he most complicated and at times frustrating tasks in implementing PID technology can be finding the proper variables for P, I and D in a given situation. In an air roaster for instance, a change in heating energy has a nearly immediate effect, but in my other PID application, controlling the brew head temperature measured in the
cooling ring of a La Pavoni espresso machine, it takes much longer before an increase or decrease of energy from the boiler's heating element has the desired effect.
How would the FZ-94 behave? The drum mass, the mass of the machine, the airflow, the responsiveness of the probe and above all the warmup and cool-down time of the elements create a complex situation.
Luckily the FUJI PXG-4 is a very smart device which has already proven several times before how it can study a given process, analyzing the impact and response time of a certain surge of energy and the sudden shut down of energy inserted in the system.
I started the FZ-94, the Fuji and Artisan, loaded the configuration file provided by Marko Luther, checked that the entire array of LCDs showed their values correctly, moved the DT slider to allow the elements to be active, switched them on, then set a target BT of 149ºC using the slider in Artisan and watched what happened.
![]() |
| FUJI PXG-4 controller next to the laptop with Artisan |
![]() |
Auto-tune of PXG-4
|
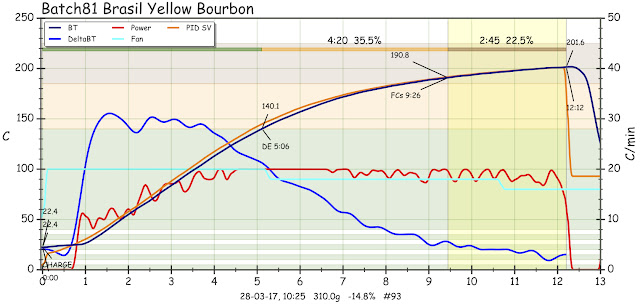
AnalysisAfter 7 minutes, when BT reached target, I activated the Auto Tune option of the FUJI PXG-4 from within the Control menu of Artisan. Everything kept working as it was. The FUJI completely switched off the elements' power using the SSRs and a tiny blip in the bottom right corner of the FUJI indicated that auto-tune was actively evaluating the process.
Variables foundFive minutes later the FUJI switched all three elements full ON for almost 2.5 minutes, then all OFF again for nearly 4 minutes and by then it had reached its conclusion: P=10, I=268 and D=51 for this given situation of an empty roaster with about 30% airflow, all 3 elements enabled, idling at 149ºC and indeed, it cruised the BT towards the target and kept it there smoothly.
So this is already a very nice start. I have saved these PID settings under one of the PID buttons on the Artisan startup screen and will use this one to warm up the machine and always have an indentical startup energy situation.
NextStarting a similar auto-tune session with a bean mass is next in line. I plan to initiate this at 140ºC. Not too hot anyway, as I must allow the FUJI to find out what a certain amount of time "full throttle" will do to the BT values while I don't want the roast process running out of the safe temperature boundaries.
Thank youI want to thank
Marko Luther for his work on Artisan and his continuous drive and open mindedness to
affordable innovation in roasting. His courage to invest time, talent and hard work beyond imagination is laudable.
A number of happy users of Artisan have already donated to show their appreciation for this magnificent tool that is used by so many roasters, both commercially and at home and
I encourage everyone else to contribute as well. I surely did.
Much thanks also to
Tije de Jong who has again been tireless in creating custom made hardware solutions to enable these adventures.