↧
Xmas at Maasvlakte


↧
WBC champion Gwilym Davies: "After I won I realized how little I knew"
Below is an interview from the European Coffee Trip team with World Barista Champion Gwilym Davies. Very nice to watch, inspiring.
At about 25 minutes he tellshow he started using a lever machine and had no idea. That's when he started weighing his grounds and his shots and he learned more.
Before that, he had won the World Barista Championship but he says, "After I won I realized how little I knew."
Also tips for beginning barista's and for those wanting to start a business. There are a lot of investors out there but first of all you need to "learn how to use a spreadsheet."
He is a judge now at barista championships and he says he can tell a good barista "from little things -- the flow, the efficiency of his operating the machine. A good barista can make a bad shot, but he will know, and make you another one."
He says most new coffee places are alike, since the "third wave" concept is well established now and bound to make money. But the industry needs to innovate, to kick the asses of the "old people" like himself, he claims.
How to improve: "Admit that you don't know that much."
↧
↧
Pressure profiling on the Rocket Giotto
Peter van der Weerd of www.kafko.nl added a dual opv feature to my espresso machine a while back.
I used to have it on 4 & 9 bar but after reading about the upcoming new LONDINIUM L1-P which will have an advised line pressure pre-infusion pressure of 2 bar, I decided to play with a low pressure pre infusion on the Rocket as well.
The result of the first two cups is very promising, a soft and creamy quality to the Indonesian beans I used. Time and experience will tell me more.
↧
Coffee roasting on the Roastilino -- full length video
Two camera's: one iPhone 6 plus on the Roastilino & PXG4, one Canon 5D III on the Artisan roasting program screen.
When I just started off with roasting I was looking high and low for a video like this and only found one, but right after I left a comment the owner deleted the video before I had had time to download & save it. There are still precious few full length roasting videos with this type of roaster online for free.
I loaded both video streams over each other (syncing using the background music on both audio streams) and then cut away parts of the one so as to make the other one visible.
Previous relevant blogs:
Planning the roast
Measuring bean density
Building & using the PXG4 controller
↧
Grinding Coffee in the Winter Sun / Zij Malen De Koffie
English version:
As I grind coffee for my first espresso of the day I notice how the low winter sun (which has just climbed over the roof tops of the houses on the other side of the Kostverlorenvaart canal) creates a spectacle about the coffee grinds falling from the funnel below the burrs. I quickly grab my phone to save a few of these moments before the sun will disappear again.
Dutch translation:
Ik zag net de maler in het laagstaande winterzonnetje. Dat zag er zo mooi uit dat ik het maar even heb gefilmd. Zou zo kunnen worden gebruikt in een prachtige documentaire “Zij Malen De Koffie” over de vrijwel anonieme ambachtslieden die dag in dag uit koffie malen opdat moeder de vrouw haar gemalen Roodmerk van de schappen kan pakken. Iedereen kent wel iemand die maler is van beroep maar slechts weinigen kennen de mores van de werkvloer en vrijwel niemand weet van het subtiele lichtspel dat de laaghangende zon speelt, hartje winter rond koffietijd of op de zeer late zomeravond als er overgewerkt moet worden in de fabriek omdat heel Nederland aan de ijskoffie gaat.
Ze doen het toch maar. Top kerels.
↧
↧
Measure the Moisture, Glean the Bean
 |
| Hey look, a parcel arrived! |
One cheap and simple test to prepare for these variables is to measure the density of the bean.
An additional method is measuring the moisture in the bean. There are two types of instruments to do this and they both observe the bean mass as if it was a component in electronics.
One of these treats the bean mass as if it were a resistor and it either measures a standard volume of beans to see how much current can flow through it or it measures the possible current between two pins of a "fork" that is stuck into a large bean mass, in a bag for instance. If the beans have more moisture inside them, they conduct electricity better.
The other method views the bean mass as a capacitor and checks how much electricity can be temporarily stored into it.
Some combine this with a weight and temperature measurement and some instruments use "all of the above" to get the most accurate results.
 |
| Can't wait to see |
Even for coffee roasters it is not very common to have these things around.
Possibly the best available today is the Coffee Pro Moisture Mac, but it costs about $ 480 plus any customs fee that might be incurred (always a surprise element). I am considering to get one but I've been checking out some affordable alternatives as well.
I found one that comes with its own beautiful case for about half the price:
http://ksyuanhan.en.alibaba.com/productgrouplist-219357505/Grain_Moisture_Meter.html
 |
| Looks good! |
 |
| Cup to be filled with beans |
 |
| On the left, the disc pushed down by a spring |
 |
| Filled the cup |
 |
| Screwed on the cap until the metal axis is level with the cap top |
 |
| Reading results as if these were soy beans (surprise below) |
Wile65 grain moisture meter is a LCD display multifunctional testing instrument, widely using, can measure with 16 different kinds of corn and other varieties of food according to the requirements.
Accuracy: ± 0.5%.
Grain measure range: 8-40%
Oil crop measure range: 5-25%

Prior to my order, I corresponded much with the agent of the company. Some businesses were closed the past Xmas / New Year days but I got prompt replies 24/7 as if there was no time zone and no days off. So here I want to express my gratitude to Beata Chu of the Kunshan Yuanhan Electronic Equipment Co., Ltd. --- Thankyou Beata!
I specifically wanted to know how useful this device would be to measure coffee beans. Beata had no experience with this application but she most willingly sent me all the data and manuals she could find for me.
The software of the device converts the outcome of the electronic measurement into the practical moisture result for the grain type that you have crunched into the measuring chamber. For instance, if you measure coffee beans with 14.7% of moisture, the same would mean 10.2% if they were soy beans and if you had loaded peanuts the electrical charge potential would mean they had 8.3% of moisture.
A standard Wile65 would need to be specially pre-programmed for coffee measurements (and that extra service comes at a premium to be paid) or you can use the device in a generic mode and work with a conversion table supplied by the manufacturer to see wat the reading means for coffee beans.
I was most pleasantly surprised to find that this Wile65 was already pre-programmed for coffee beans!

The next steps will be testing more beans and possibly comparing the readings with a calibrated similar device from another roaster. The device will already tell me if one batch of beans is less or more moist than a mother, which is very helpful to start with. A calibration puck can also be purchased. Or I could weigh, measure and then oven-dry the beans to compare this against their 0% moisture weight.
Without a personal business interest (I paid the full price through a Western Union agency) I wholeheartedly endorse the good people of the Kunshan Yuanhan Electronic Equipment Co., Ltd. It could be profitable to import and sell these but I'm more than willing to share my sources and work with others who want to get the same device. I'd love to hear your views if you get one.
PS My friend Gábor Laczkó sends me a link with reviews:
http://www.fwi.co.uk/machinery/8-popular-moisture-meters-put-to-the-test.htm
Ease of use Simple. Just scoop crop into the chamber and level off. Then turn lid until metal disc becomes flush with top of lid. This requires little effort. Just two buttons to flick through to choose crop type and carry out the test.
Carrycase Thin plastic box.
Calibration process Calibrations for each crop are quick and easy to adjust. The problem is that they’re easy to erase too.
↧
Danny O'Neill about Starting a Coffee Roasting Company
I just watched these four segments of a brilliant talk by Danny O'Neill, founder of his own highly successful coffee roasting company in Kansas City. Had never heard of him before.
He needs a few minutes to warm up but all of what he has to say is so straightforward and sincere that it's a practical wisdom version of business savvy and pure decency. Very inspiring I think for people wanting to start their business in whatever market.
His success depended on a lot of tiny bits of dumb luck before success started to appear in small portions. Intriguingly, he was helped through the first very hard months initially by two car wrecks and then by an earthquake. You have to watch him tell that so I won't spoil the story.
His company's method of staff selection for instance sounds great. If a super talent comes over and performs outrageously well, they still first call the taxi driver that drove him from the airport and back and if the candidate was anything less than decent and friendly, they will never hire him.
He even has advice straight from the heart to people who've already "made it" and are ready to sell off their company and live the American dream. Don't sell, he says. He knows more than a dozen friends who've made it big and sold, but none of them are happy that they did. When your company is hugely successful, you must have been (and be!) passionate about it -- you do not sell such a thing and get happy.
He does take much more time to be with his family though.
Go watch this!
↧
Measure the Moisture [part 2]
(See also Part 1)
On the Wile65 moisture analyzer you can adjust the readings if you find that the results are consistently higher or lower than a reference device.
The two barista's that I know who have a similar moisture analyzer are currently very busy getting their new roastery & cafe ready to open up and they have not had time yet to try out their moisture device, so I do not currently have a reference.
Instead, I took 1000g of beans that measured 14% and put them in an oven at a temperature between 100-110ºC for 26 hours over two days (48 hours), switching the oven off when I left the house and when I went to sleep. The oven cools down slowly so the beans were in a hot environment longer than the 26 hours.
Then I weighed them again and they were 904.5g which I count for 905g and this might indicate the beans were originally over 10% in moisture but probably not 14%.
I will next do a few tests with samples of 200g of beans from the same "14%" source in the hot air roaster at 100ºC exactly. I will need to see how long they need to be in there to measure 10% or preferably more of weight loss.
 |
| exactly 1.000g in |
 |
| on a plate in the oven |
 |
| probe on/in the bean mass |
 |
| monitoring the temp |
 |
| after 2 days, almost 10% weight loss |
↧
Measure the Moisture [Part 3]
(Part 2 is here:
http://kostverlorenvaart.blogspot.nl/2015/01/measure-moisture-part-2.html)
The oven is a very time consuming method but it seems better than using the air roaster.
I loaded 200g of the 14% beans and ran this program:
1) Ramp up to 140ºC in 2 minutes
2) Stay at 140ºC for 60 minutes
About every 9 minutes there is a little ripple in the graph because then the roaster needed a restart. At 09:30 it switches off as a safety measure to I needed to quickly restart it before that time limit.
Result: 200g in, 182.6g out
Not very conclusive material.
Measuring against another meter seems much much simpler.
![]()
![]()
http://kostverlorenvaart.blogspot.nl/2015/01/measure-moisture-part-2.html)
The oven is a very time consuming method but it seems better than using the air roaster.
I loaded 200g of the 14% beans and ran this program:
1) Ramp up to 140ºC in 2 minutes
2) Stay at 140ºC for 60 minutes
About every 9 minutes there is a little ripple in the graph because then the roaster needed a restart. At 09:30 it switches off as a safety measure to I needed to quickly restart it before that time limit.
Result: 200g in, 182.6g out
Not very conclusive material.
Measuring against another meter seems much much simpler.


↧
↧
Tije's zinc compound fix for rusty La Pavoni drip trays
This morning, Tije replaced a p-stat on one of my La Pavoni's and he also treated the rust on the inside of the La Pavoni drip tray.
Using a dremel he first cleared the existing rust and then he rubbed it in with a zinc compound. Finishing it off he rubbed it with a cloth and now a rusty drip tray shines again:
Using a dremel he first cleared the existing rust and then he rubbed it in with a zinc compound. Finishing it off he rubbed it with a cloth and now a rusty drip tray shines again:
 |
| Brushing off the rust |
 |
| Zinc compound rubbed in |
↧
Second Fuji PXG-4 temperature controller
Early last year I built a roast controller for my Fracino Roastilino home coffee roaster. It reads the temperature from a probe in the roasting chamber and it sends a start-stop signal to the Solid State Relay inside the roaster that switches the heater element.
This controller can be programmed to ensure that a certain temperature profile is executed over time with a high degree of precision per second.
When a pressostat of one of my La Pavoni's stopped working recently, I thought it would be nice to have a temperature controller much like the one I have for the roaster, but this time incorporating its own SSR (Solid State Relay) to switch the heating element of the espresso machine. It could take over control of the heater, replacing the pressostat.
The pressostat is built like the heart of a barometer, a drum-like box with a membrane at one end that can bulge outward more or less, depending on the pressure changes. If the membrane bulges outward from the boiler pressure inside it, it pushes a microswitch or it tumbles a larger switch. If the pressure falls back, the bulge dissipates and it releases the switch again.
A set screw decides at what point the switch will flip and this way the pressure inside the boiler is controlled in a very easy, cheap, simple and durable way.
Since boiler pressure is caused by boiler water temperature, the pressure switch regulates the temperature as well.
One could also measure the temperature and use a PID system to regulate this temperature which will in turn also regulate the pressure inside the boiler. This PID system would likely be more complicated and costly, especially if I would like to be able to program and monitor it using my computer and the free Artisan software, but it would be fun and educational to try.
It would be interesting to control the espresso machine temperature from my laptop and read the temperature in a graph on my screen, also monitoring the temperature values on my iPhone that's connected wirelessly to the Artisan software.
One new application could be to have the espresso machine go into 'hibernation' mode after a certain idle time. It could then cool down to moderate temperatures, yet high enough to be back up to working pressure / temperature very quickly if there is renewed need for espresso.
Or pressure could be increased for a few seconds to have an extra high pre-infusion pressure without the higher (slower) rise of temperature in the brew group.
So I ordered the same parts again but now I included a SSR that is powerful enough to switch heating elements ranging from the little La Pavoni to the Rocket espresso machine or even the 2750 W LONDINIUM machine.
Today, Tije customized the box for the parts and got it all ready for me to wire up and program.
At home I wired up the internals:
(as per the specifics posted on my blog:
http://kostverlorenvaart.blogspot.nl/2014/01/fuji-pxg4-setup-for-coffee-roasting.html
just now the output going to the SSR is going to the input of the SSR inside the box and the output of the SSR is going to one of the sockets on the back, to replace the pressostat switch or the heater switch on the machine to control)
![]()
![]()
![]()
Related links:
This controller can be programmed to ensure that a certain temperature profile is executed over time with a high degree of precision per second.
When a pressostat of one of my La Pavoni's stopped working recently, I thought it would be nice to have a temperature controller much like the one I have for the roaster, but this time incorporating its own SSR (Solid State Relay) to switch the heating element of the espresso machine. It could take over control of the heater, replacing the pressostat.
The pressostat is built like the heart of a barometer, a drum-like box with a membrane at one end that can bulge outward more or less, depending on the pressure changes. If the membrane bulges outward from the boiler pressure inside it, it pushes a microswitch or it tumbles a larger switch. If the pressure falls back, the bulge dissipates and it releases the switch again.
A set screw decides at what point the switch will flip and this way the pressure inside the boiler is controlled in a very easy, cheap, simple and durable way.
Since boiler pressure is caused by boiler water temperature, the pressure switch regulates the temperature as well.
One could also measure the temperature and use a PID system to regulate this temperature which will in turn also regulate the pressure inside the boiler. This PID system would likely be more complicated and costly, especially if I would like to be able to program and monitor it using my computer and the free Artisan software, but it would be fun and educational to try.
It would be interesting to control the espresso machine temperature from my laptop and read the temperature in a graph on my screen, also monitoring the temperature values on my iPhone that's connected wirelessly to the Artisan software.
One new application could be to have the espresso machine go into 'hibernation' mode after a certain idle time. It could then cool down to moderate temperatures, yet high enough to be back up to working pressure / temperature very quickly if there is renewed need for espresso.
Or pressure could be increased for a few seconds to have an extra high pre-infusion pressure without the higher (slower) rise of temperature in the brew group.
So I ordered the same parts again but now I included a SSR that is powerful enough to switch heating elements ranging from the little La Pavoni to the Rocket espresso machine or even the 2750 W LONDINIUM machine.
Today, Tije customized the box for the parts and got it all ready for me to wire up and program.
 |
| Drawing the lines to cut |
 |
| Drilling corner holes |
 |
| Cutting into the soft metal, very precise using a thin disc |
 |
| Holes for the on/off switch and program start |
 |
| Widening a hole |
 |
| Shortening a screw |
 |
| Back of the controller: power in, heater power out, probe in, USB/serial out. |
 |
| Front of controller: on/off, PXG-4 PID and program start. Next to it the simple classic pressostat. |
At home I wired up the internals:
(as per the specifics posted on my blog:
http://kostverlorenvaart.blogspot.nl/2014/01/fuji-pxg4-setup-for-coffee-roasting.html
just now the output going to the SSR is going to the input of the SSR inside the box and the output of the SSR is going to one of the sockets on the back, to replace the pressostat switch or the heater switch on the machine to control)


Related links:
↧
Wiring the La Pavoni for the Fuji PXG-4 controller
To safely connect the SSR output of the new Fuji PXG-4 controller to the heating element of the La Pavoni, I drilled a hole in the side of the foot of the little espresso machine. A flexible cable (formerly the 220V cable of a Macbook Pro) goes from the Fuji box into the bottom of the La Pavoni and the two connectors that the pressostat was switching are now connected to that cable with cable shoes.
I used tie-wraps to ensure that the new cabling does not touch any of the hot surfaces and another wide tie-wrap to make sure the cable can't be pulled out by accident.
I decided to connect the K-type thermocouple to the bottom of the boiler at the same spot where the thermal fuse is connected.
This way, the probe cable and the SSR cable can both use the same exit and be also tie-wrapped together. The advantage is that this new addition of a thermo-controller does not come with too many different wires that will trail the espresso machine if for instance I want to unhook it and empty the boiler into the kitchen sink.
Also, if the probe is securely fastened, one avoids that it accidentally comes lose and then causes the temperature controller to fire up the heating element on full capacity trying to raise the temperature of the probe that's dangling somewhere at room temperature.
I do wonder if my SSR cables are robust enough to stand the heat in the foot of the machine. The older wires all have a different type coating, the same type you see in very old radios or toasters. The wires inside my bigger more modern espresso machines are not very different than what I used now though.
I configured the Fuji PXG-4 using the detailed blog I'd written early last year. Happy to have saved that step-by-step procedure at the time.
I manually went through the menus of the PXG4 as described in the "setup" blog listed below and I noticed when making the connection to the Artisan software that I had left out the setting of the decimal value in my earlier setup description. So do not forget to do this as well: as per page 75 of the full PXG4 manual, set one decimal place. Then, Artisan will not see 24ºC as 2.4ºC ;-)
Also, I struggled a while getting the PXG4 to communicate with Artisan over the USB port and just before hacking into the normally "hidden" communication menu I found out that the tiny "audio type" jack under the PXG4 needed to be pushed in a tiny bit more... I want to thank the Fuji France director Stéphane Montbrizon for his amazingly fast late night response to my request for assistance!
Related links:
 |
| Pressostat wires still in place |
I decided to connect the K-type thermocouple to the bottom of the boiler at the same spot where the thermal fuse is connected.
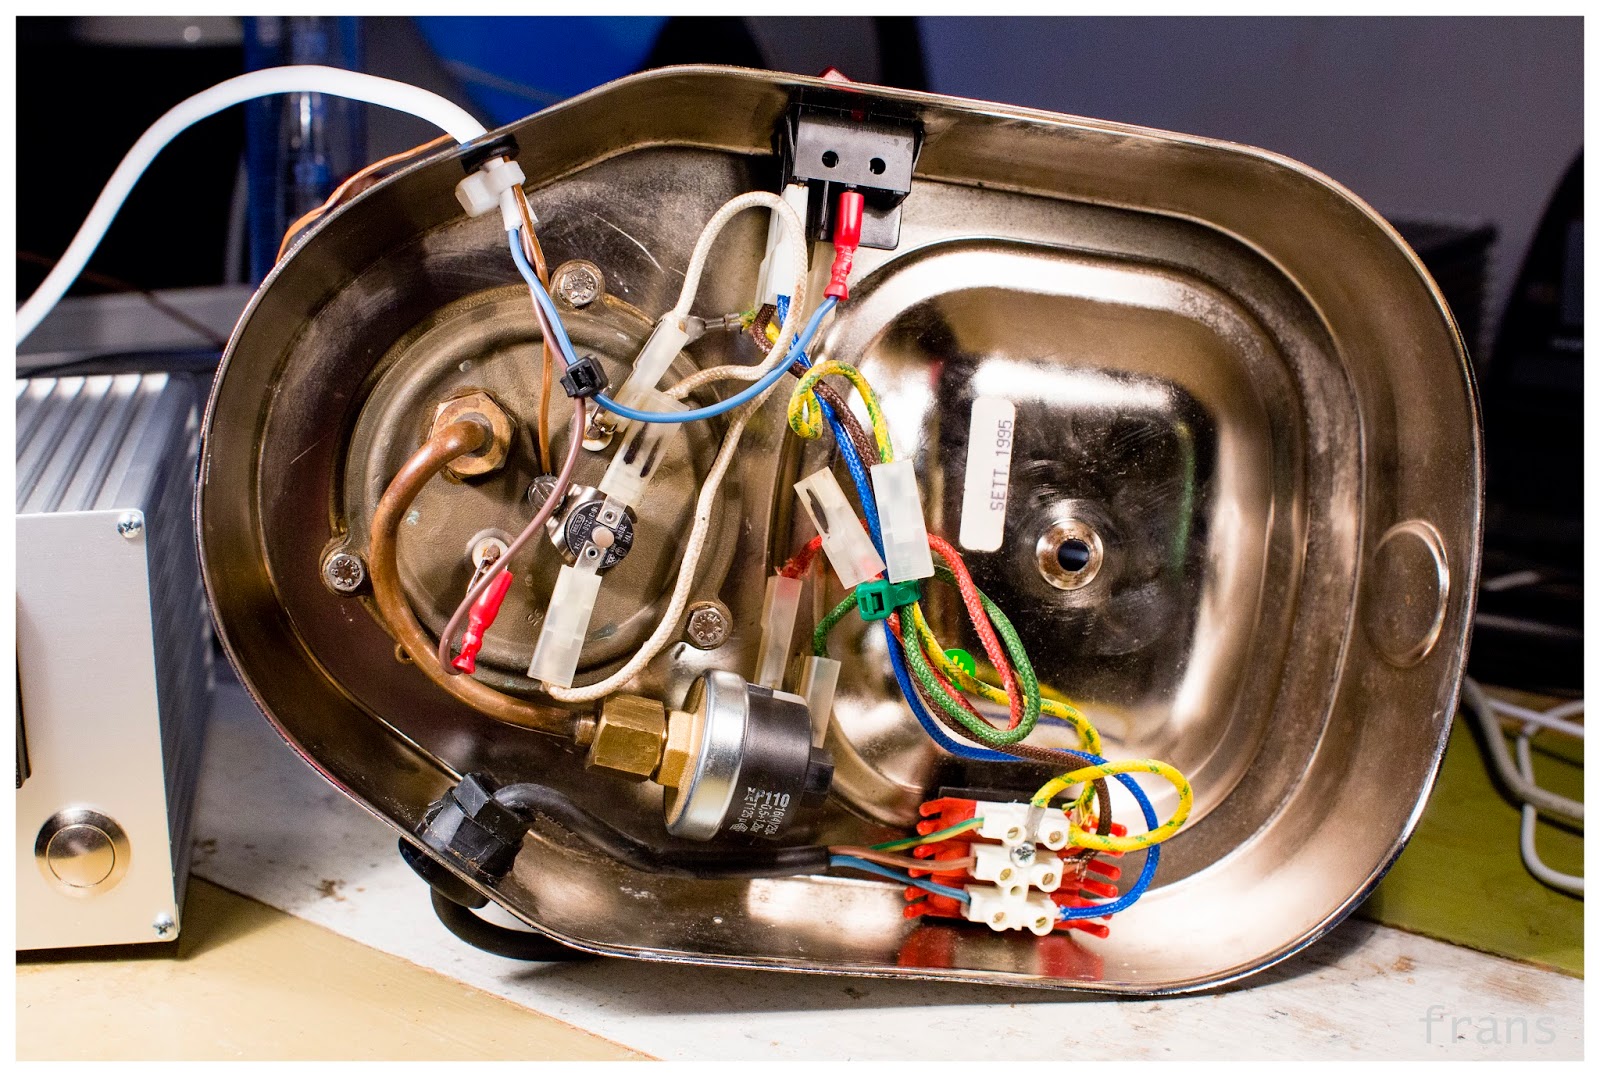 |
| K-type probe at the bottom centre left, SSR cables connected |
This way, the probe cable and the SSR cable can both use the same exit and be also tie-wrapped together. The advantage is that this new addition of a thermo-controller does not come with too many different wires that will trail the espresso machine if for instance I want to unhook it and empty the boiler into the kitchen sink.
Also, if the probe is securely fastened, one avoids that it accidentally comes lose and then causes the temperature controller to fire up the heating element on full capacity trying to raise the temperature of the probe that's dangling somewhere at room temperature.
I do wonder if my SSR cables are robust enough to stand the heat in the foot of the machine. The older wires all have a different type coating, the same type you see in very old radios or toasters. The wires inside my bigger more modern espresso machines are not very different than what I used now though.
I configured the Fuji PXG-4 using the detailed blog I'd written early last year. Happy to have saved that step-by-step procedure at the time.
 |
| Ready to roll, Fuji PXG-4 on the left, USB cable center, La Pavoni right |
Also, I struggled a while getting the PXG4 to communicate with Artisan over the USB port and just before hacking into the normally "hidden" communication menu I found out that the tiny "audio type" jack under the PXG4 needed to be pushed in a tiny bit more... I want to thank the Fuji France director Stéphane Montbrizon for his amazingly fast late night response to my request for assistance!
Related links:
↧
Time to PID a Pavoni
Several models of espresso machines have a PID on board these days. As far as I know, all of these are used as mere thermostats, making sure the boiler (and sometimes a second boiler) is kept at the right designated temperature, and since temperature and pressure go hand in hand inside a boiler, also the correct pressure.
For a brew boiler, the temperature is most important even though the pre-infusion pressure is relevant as well in a lever machine. For a steam boiler, the pressure is most important to be able to steam that milk to a creamy froth. Still, these values, pressure and temperature, cannot be seen separately.
A problem for most PID devices is that it's HOT inside an espresso machine, around 50ºC and the PIDs are mostly designed to survive in an environment of 60ºC maximum. The result is that such a PID inside often has a limited lifetime.
On the current Rocket espresso machines the PID is placed as low as possible in the housing of the machine, hidden behind the drip tray, where the heat is less of a problem and where room temperature air is flowing past it, up into the body of the machine. One additional advantage is that the "digital" looks of the PID does not ruin the classic design of the machine front.
A PID can be very convenient in the smallest semi-automatic espresso machines like the Rancilio Silvia.
Some have already built a simple PID in a La Pavoni as well, as you can see with a quick search on YouTube. One user, Ray, finished such a project in 2011 and he has recently decided to sell that machine.
Still, I haven't yet seen anyone fitting an espresso machine with a fully programmable PID that can also be programmed and monitored on a computer and an iPhone. So I set out to build one, copying most of the hardware and settings from my earlier build of a roast controller, based on the highly configurable Fuji PXG4 controller.
One thing that I learned from the first two tests, warming up the La Pavoni and making an espresso, is that it makes a big difference that this little machine has no anti-vac.
As the heater is on full power after the first minute, and the water inside the boiler warms up, the air above the water column also heats up and expands. This "false pressure" cannot escape as it does during warm up in most larger espresso machines and the heating element struggles to get the temperature and 'real' water/steam pressure up.
You can see this in the illustrations below.
The dark line that climbs up immediately at the start is the heater which is gradually turned up to full capacity in the first minute. The red line is the target temperature which is reached at 13 minutes. The PXG4 already gradually turns down the heater after 11 minutes in anticipation of the water inside the boiler reaching its final temperature level. A more primitive PID might allow the element to work harder, then overshooting the target and subsequently meander around the actual target temperature.
Having the PXG4 "get the feel" of the La Pavoni during a short "auto tune" session does help and also switching on the optional "fuzzy logic" of the PXG4 instantly makes the controller very effective. No need to tweak and search for the optimal settings of the P, I and D variables.
What intrigued me was how much easier the heater could do its job after I had released the excess of expanded air after 10 minutes. Until then, the heater had been on full blast and all of a sudden it had a much easier life.
This could be a reason to build an anti-vac on the La Pavoni or at least make it a habit to keep the steam valve open and stay around the machine to close it once hot water and steam begin to come out of the steam wand.
In the example below, I did just that, keeping the steam valve open until it started to spit hot wetness:
In both cases, the bottom of the boiler reached the boiling point of 100ºC at about 10 minutes.
Interestingly, after 9 minutes in the second example with the steam wand open, starting at 80ºC when the boiler water began to audibly "sing", the PXG4 temporarily lowered the heater load and at the same time the heater was more effective. I closed the steam valve around 9:30 and the PXG4 kept the element at full capacity again, lowering that gradually after 12:30 to make sure the temperature landed and stayed exactly at the new target temperature that I had selected.
Another thing that strikes me: once the boiler is hot enough, the element has very little work to do, around 20-30% of capacity, in short spurts of a few seconds at a time. Having a 1000W espresso machine does not mean you are spending much money on a machine burning a kilowatt continuously. It's mostly idling away at a low capacity.
Now it has become very easy to figure out what temperature I like best for my cup from this little machine.
I have added a second probe to the group so I can monitor what (if any) constant difference there is between the temperature at the bottom of the boiler and the temperature on the top of the brew group, comparing this to the heat sensation when drinking an espresso, and looking at the color of the extraction. The crema should be darkly mottled but not too dark as if burnt.
Anyway, next time I need to go on a short vacation I plan to take this new expanded setup with me so I can safely ignore the tourist destinations near my hotel and enjoy the bliss of my own delicious brew!
As always, thanks Marko Luther for the free Artisan software, Wa'il al-Wohaibi for your advice, and the staff at FUJI for your assistance. And Tije for customizing the aluminum box!
Related links:
http://kostverlorenvaart.blogspot.nl/2015/01/wiring-la-pavoni-for-fuji-pxg-4.html
For a brew boiler, the temperature is most important even though the pre-infusion pressure is relevant as well in a lever machine. For a steam boiler, the pressure is most important to be able to steam that milk to a creamy froth. Still, these values, pressure and temperature, cannot be seen separately.
A problem for most PID devices is that it's HOT inside an espresso machine, around 50ºC and the PIDs are mostly designed to survive in an environment of 60ºC maximum. The result is that such a PID inside often has a limited lifetime.
On the current Rocket espresso machines the PID is placed as low as possible in the housing of the machine, hidden behind the drip tray, where the heat is less of a problem and where room temperature air is flowing past it, up into the body of the machine. One additional advantage is that the "digital" looks of the PID does not ruin the classic design of the machine front.
A PID can be very convenient in the smallest semi-automatic espresso machines like the Rancilio Silvia.
Some have already built a simple PID in a La Pavoni as well, as you can see with a quick search on YouTube. One user, Ray, finished such a project in 2011 and he has recently decided to sell that machine.
Still, I haven't yet seen anyone fitting an espresso machine with a fully programmable PID that can also be programmed and monitored on a computer and an iPhone. So I set out to build one, copying most of the hardware and settings from my earlier build of a roast controller, based on the highly configurable Fuji PXG4 controller.
 |
| Fuji PXG4 controller on the left, red Amprobe for group temp, iPhone monitor, La Pavoni and Artisan on the laptop |
As the heater is on full power after the first minute, and the water inside the boiler warms up, the air above the water column also heats up and expands. This "false pressure" cannot escape as it does during warm up in most larger espresso machines and the heating element struggles to get the temperature and 'real' water/steam pressure up.
You can see this in the illustrations below.
 |
| Released steam/air after 10 minutes, then the water warmed up faster |
Having the PXG4 "get the feel" of the La Pavoni during a short "auto tune" session does help and also switching on the optional "fuzzy logic" of the PXG4 instantly makes the controller very effective. No need to tweak and search for the optimal settings of the P, I and D variables.
What intrigued me was how much easier the heater could do its job after I had released the excess of expanded air after 10 minutes. Until then, the heater had been on full blast and all of a sudden it had a much easier life.
This could be a reason to build an anti-vac on the La Pavoni or at least make it a habit to keep the steam valve open and stay around the machine to close it once hot water and steam begin to come out of the steam wand.
In the example below, I did just that, keeping the steam valve open until it started to spit hot wetness:
 |
| Kept steam valve opened until steam / hot water spat out at about 9:30 |
Interestingly, after 9 minutes in the second example with the steam wand open, starting at 80ºC when the boiler water began to audibly "sing", the PXG4 temporarily lowered the heater load and at the same time the heater was more effective. I closed the steam valve around 9:30 and the PXG4 kept the element at full capacity again, lowering that gradually after 12:30 to make sure the temperature landed and stayed exactly at the new target temperature that I had selected.
Another thing that strikes me: once the boiler is hot enough, the element has very little work to do, around 20-30% of capacity, in short spurts of a few seconds at a time. Having a 1000W espresso machine does not mean you are spending much money on a machine burning a kilowatt continuously. It's mostly idling away at a low capacity.
Now it has become very easy to figure out what temperature I like best for my cup from this little machine.
I have added a second probe to the group so I can monitor what (if any) constant difference there is between the temperature at the bottom of the boiler and the temperature on the top of the brew group, comparing this to the heat sensation when drinking an espresso, and looking at the color of the extraction. The crema should be darkly mottled but not too dark as if burnt.
Anyway, next time I need to go on a short vacation I plan to take this new expanded setup with me so I can safely ignore the tourist destinations near my hotel and enjoy the bliss of my own delicious brew!
 |
| Not forgetting this is in the end all about the joy in the cup! |
Related links:
http://kostverlorenvaart.blogspot.nl/2015/01/wiring-la-pavoni-for-fuji-pxg-4.html
↧
↧
Plotting the Pavoni Pulse
In the previous post I described how a Fuji PXG4 can control the La Pavoni Pro lever machine.
Today I added two extra probes to the free Artisan software so I could simultaneously monitor the temperatures of three essential points indicating the overall behavior and stability of the machine:
1) BT=Boiler Temperature as measured at the bottom of the boiler
2) Brew Group temperature as measured on top of the brew group
3) Coffee Puck, to see at what temperature the espresso is extracted
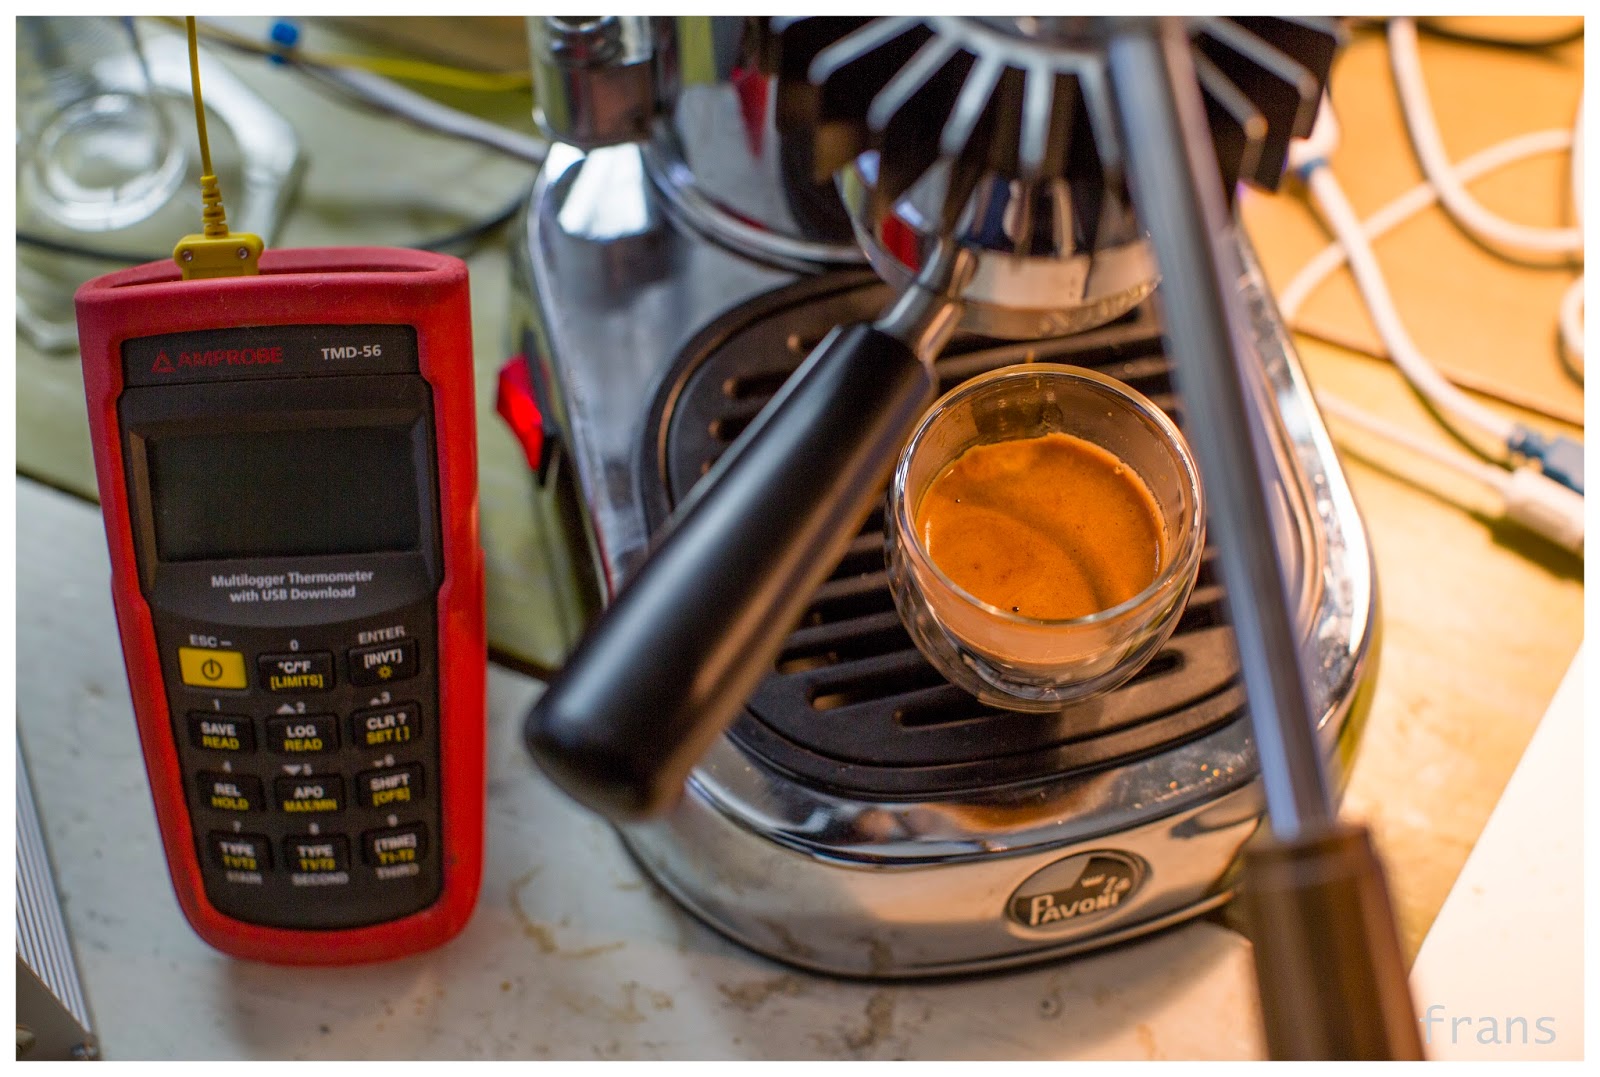
To connect the two extra probes I used the Amprobe 56 temperature logger.
Two earlier tests, not documented here, showed me what's the best Boiler Temperature for an extraction around 93ºC. In such things, taste of the espresso and the looks of the crema (not too light, not too dark, the right 'tiger skin' flecks) are decisive and not the 'exact' measurements since probes and loggers have a certain tolerance.
A BT of 120 yielded a scorching hot espresso that touched 99ºC in the puck, so practically boiling temperatures and a BT of 110 got the espresso too light and not hot enough for me. At BT=116ºC this La Pavoni Pro machine worked best as the graphs below will illustrate.
The task (see red line in the graph below) I had set for the PXG4 was to get the boiler at 116ºC in 10 minutes. You can see below that the actual Boiler Temperature joins the target at about 12 minutes.
What I find most fascinating is the behavior of the water between the 7 minute point and the 10 minute point. At 7 minutes, around 70ºC, the water inside the boiler gets more audible, bubbling and softly whistling for a moment even. Air above the water is expanding and softly blowing out of the opened steam wand. The water is heating up faster, the BT line climbing more steeply than before and at the same time the PXG4 needs less power to keep the Rate of Rise it had.
I am not sure what causes the heater in the boiler to be more effective all of a sudden, even with less power driving it. Could it be that not only the air column above the water starts moving out and a little less mass needs to be heated, but also that air that was 'dissolved' in the water is escaping, creating a more dense water mass? See also the more detailed graph further down this page.
After 13 minutes, when the BT target has been reached, I do a 30ml flush to warm up the group more quickly. This is effective. After a first espresso I do a brief flush to clean the shower screen but after that the group needs a few minutes to cool down so in the future I'd better just wipe the shower screen clean.
The two extractions that I did came out fairly well but at the side of the basket where the probe was inserted, the probe had wriggled inside the puck as I locked in the portafilter against the group. This could be avoided if I drilled a hole in the bottom of the basket but that would also possibly cause channeling. Now, some first drops appeared below the insertion of the probe and I took some extra time for pre-infusion to get the puck wet and expanded, closing off most of the 'leakage'.
The "NAKED" portafilter in the picture was produced by Gábor from http://www.naked-portafilter.com
Above, I highlight what's happening in the 3 minutes after the BT reaches 70ºC
The extraction of espresso's is fairly stable in temperature, thanks to the Fuji PXG4 and the special La Pavoni Heat Sink built for me by Tije in Amsterdam. The second espresso was slightly warmer, maybe caused by the brief flush but after that second extraction, the group temp returns easily to a temperature close to that before the extraction.
The second cup happened to taste a little better.
The Fuji PXG4 is controlling the machine very well. Since it has no "dead band" the target temperature can be sustained continuously and as such it "wins" from a pressostat but the pressostat does its job at a very low cost, inside a very tiny part with a simple screw to adjust its setting and that simplicity is unbeatable.
I do like the option that the Fuji PXG4 provides to monitor so many details of the 'life' inside the machine, especially when coupled to Artisan and optional extra probes, using the Amprobe 56 or, as an alternative, the more affordable Phidgets.
Related links:
http://kostverlorenvaart.blogspot.nl/2015/01/wiring-la-pavoni-for-fuji-pxg-4.html
Today I added two extra probes to the free Artisan software so I could simultaneously monitor the temperatures of three essential points indicating the overall behavior and stability of the machine:
1) BT=Boiler Temperature as measured at the bottom of the boiler
2) Brew Group temperature as measured on top of the brew group
3) Coffee Puck, to see at what temperature the espresso is extracted
To connect the two extra probes I used the Amprobe 56 temperature logger.
 |
| Setup: Artisan program, PXG4 controller, La Pavoni, Amprobe, books about lichens |
A BT of 120 yielded a scorching hot espresso that touched 99ºC in the puck, so practically boiling temperatures and a BT of 110 got the espresso too light and not hot enough for me. At BT=116ºC this La Pavoni Pro machine worked best as the graphs below will illustrate.
The task (see red line in the graph below) I had set for the PXG4 was to get the boiler at 116ºC in 10 minutes. You can see below that the actual Boiler Temperature joins the target at about 12 minutes.
What I find most fascinating is the behavior of the water between the 7 minute point and the 10 minute point. At 7 minutes, around 70ºC, the water inside the boiler gets more audible, bubbling and softly whistling for a moment even. Air above the water is expanding and softly blowing out of the opened steam wand. The water is heating up faster, the BT line climbing more steeply than before and at the same time the PXG4 needs less power to keep the Rate of Rise it had.
I am not sure what causes the heater in the boiler to be more effective all of a sudden, even with less power driving it. Could it be that not only the air column above the water starts moving out and a little less mass needs to be heated, but also that air that was 'dissolved' in the water is escaping, creating a more dense water mass? See also the more detailed graph further down this page.
 |
| Complete graph, annotated (details cut out below) |
 |
| Close up, showing coffee puck probe inside the NAKED portafilter basket |
The "NAKED" portafilter in the picture was produced by Gábor from http://www.naked-portafilter.com
 |
| Highlighting the interesting behavior around boiling temperature |
 |
| Top view with used / dry coffee puck |
 |
| Highlighting group and puck temp around extractions |
The second cup happened to taste a little better.
The Fuji PXG4 is controlling the machine very well. Since it has no "dead band" the target temperature can be sustained continuously and as such it "wins" from a pressostat but the pressostat does its job at a very low cost, inside a very tiny part with a simple screw to adjust its setting and that simplicity is unbeatable.
I do like the option that the Fuji PXG4 provides to monitor so many details of the 'life' inside the machine, especially when coupled to Artisan and optional extra probes, using the Amprobe 56 or, as an alternative, the more affordable Phidgets.
 |
| Espresso and graphs |
http://kostverlorenvaart.blogspot.nl/2015/01/wiring-la-pavoni-for-fuji-pxg-4.html
↧
La Pavoni Brew Group Temp Control
In the previous post I had a PID made by Fuji, their PXG4, control the temperature in the bottom of the boiler of the La Pavoni.
Since I had figured out by measurements and tasting that the extraction temperature inside the puck is at the optimal value if the probe on the top of the brew group measures 88ºC I has subsequently determined that a boiler temperature of 116ºC ensures that at my current room temperature the brew group maintains the desirable temperature.
Having the probe that the PXG4 works with on the bottom of the boiler is convenient because the SSR output of the PXG4 also connects to the heating element on a spot below the boiler, so both cables can be bundled which makes for less hassle during transport, for instance when emptying the boiler in the kitchen sink.
Most other espresso machines that flaunt a PID also use the boiler connection for their probe. This way the consumer has one less cable to worry about, as it is hidden away in the casing of the machine. The manufacturer usually assumes a certain "offset" for the difference between the Boiler Temperature and the desired Brew group Temperature. For instance, if the Brew group Temp needs to be 88ºC as in the case of my La Pavoni, and the Boiler Temperature matching that is 116ºC, the offset is 28ºC.
Flint, a reader on Home-Barista, suggested I should measure this, as I have done in my previous post and I enjoyed taking this one step further: having the PXG4 work with the Brew group Temperature probe directly and letting it figure out the optimal Boiler Temperature for me.
Warming up the machine from a cold start was not ideal yet, just like having your car on highway cruise control speed while still leaving your parking space is not ideal. I worked around this by doing a few flushes, but this is not the way to go. I had not run the auto-tune for this situation yet, so having done that might help on the next start-up. In order to warm up the group, the PXG tries to heat up the boiler more than usual.
Probably the best approach would be to warm up the machine using the p-stat and once the group is near its operational temperature, switch on the "autopilot" / "cruise control". I would need to add a switch to the La Pavoni to go from one control to the other. Not a problem.
Above, you see the result of the three flushes, and the meandering of Boiler Temperature and Brew group Temperature during the time the PXG4 is in auto-tuning mode.
Highlighting the auto-tuning and the resulting stability of the Brew group Temperature.
Normally, having the room temperature mass of the portafilter locked in changes the temperature of the brew group a little. This is in practice never a real problem because at extraction time, hot water flows in and these small differences hardly affect the extraction temperature in the coffee puck. Nevertheless, I like to see that the PXG4 easily compensates by raising the Boiler Temperature 2ºC.
The result is a very stable brew group temperature during idling. Seeing how it behaves with a series of extractions will be a possible next test.
Related posts:
http://kostverlorenvaart.blogspot.nl/2015/01/plotting-pavoni-pulse.html
http://kostverlorenvaart.blogspot.nl/2015/01/time-to-pid-pavoni.html
http://kostverlorenvaart.blogspot.nl/2015/01/wiring-la-pavoni-for-fuji-pxg-4.html
Since I had figured out by measurements and tasting that the extraction temperature inside the puck is at the optimal value if the probe on the top of the brew group measures 88ºC I has subsequently determined that a boiler temperature of 116ºC ensures that at my current room temperature the brew group maintains the desirable temperature.
Having the probe that the PXG4 works with on the bottom of the boiler is convenient because the SSR output of the PXG4 also connects to the heating element on a spot below the boiler, so both cables can be bundled which makes for less hassle during transport, for instance when emptying the boiler in the kitchen sink.
Most other espresso machines that flaunt a PID also use the boiler connection for their probe. This way the consumer has one less cable to worry about, as it is hidden away in the casing of the machine. The manufacturer usually assumes a certain "offset" for the difference between the Boiler Temperature and the desired Brew group Temperature. For instance, if the Brew group Temp needs to be 88ºC as in the case of my La Pavoni, and the Boiler Temperature matching that is 116ºC, the offset is 28ºC.
Flint, a reader on Home-Barista, suggested I should measure this, as I have done in my previous post and I enjoyed taking this one step further: having the PXG4 work with the Brew group Temperature probe directly and letting it figure out the optimal Boiler Temperature for me.
 |
| PXG4 connected to Brew group Temp probe, top left of lever |
Probably the best approach would be to warm up the machine using the p-stat and once the group is near its operational temperature, switch on the "autopilot" / "cruise control". I would need to add a switch to the La Pavoni to go from one control to the other. Not a problem.
 |
| Warm up flushes and auto-tune |
 |
| After auto-tune, PXG4 ensures a perfectly stable Brew group Temp |
 |
| Locking in the cool portafilter is easily compensated by PXG4 |
 |
| Temperature stability over idle time |
Related posts:
http://kostverlorenvaart.blogspot.nl/2015/01/plotting-pavoni-pulse.html
http://kostverlorenvaart.blogspot.nl/2015/01/time-to-pid-pavoni.html
http://kostverlorenvaart.blogspot.nl/2015/01/wiring-la-pavoni-for-fuji-pxg-4.html
↧
La Pavoni: Fuji PXG4 PID and Pressostat Working Together
In my previous post I showed how the boiler of the machine almost gets too hot and pressurized when warming up with the PID temperature probe connected to the Brew Head.
I decided it would be best if I could warm up the machine using the pressostat because it is very good at starting up as fast as possible while keeping the pressure inside the boiler at a modest level.
Once the machine is almost on operational pressure & temperature, the PXG4 could take over and make sure the brew head reaches its ideal temperature and stays there too.
Thinking this through, it struck me how very convenient it is that at start up, the pressostat is ON, whereas the Solid State Relay of the PXG4 box is OFF as long as the internal program has not been started.
So the PXG4 can be ON and helping me monitor the temperature, but it will not start controlling the system until I press the button that fires up the program in its memory.
If I set the pressostat to stop heating the machine at a pressure that matches a boiler temperature close to 110ºC, I can start the PXG4 program and the PXG4 will take over control, switching the heater ON and OFF as much as is needed to reach and maintain the correct brew head temperature.
This will get the machine the best of both worlds. Not a PID replacing a P-stat, but P-stat and PID working together, each in their own best area.
I also moved the Boiler Temperature probe from below the boiler to the outside, at the back of the boiler. Below the boiler seemed a great spot earlier on but it is so close to the heating element that it does not "see" the general temperature changes in the boiler water very well.
After today I will leave off the Boiler Temperature probe altogether. I want to avoid turning the La Pavoni into a Xmas tree of gadgets and wires. More wires facilitate more tripping accidents later on, and more parts that can fail.
And also, by now I feel I know enough about the boiler temperature. It goes up and down but that's fine as long as the brew head temperature remains straight as an arrow. That means my extraction temperature will be stable as well.
In the graphs below you can still see the Boiler Temperature results.
![]()
The pressostat kindly warms up the machine here, the boiler warming up in a fairly straight line. After reaching the boiling point of 100ºC I close the steam wand as soon as serious drops of water spit out and steam follows. I also do a short flush of the group to help heating it up. After that the machine idles with the group around 75ºC and the p-stat cycling, switching the element on and off .
After 12 minutes I push the start button of the PXG4. It has been on, but not in control until then, just passing on information about the group head temperature and the inactive SSR. As soon as the PXG4 drives the machine, you can see the red line showing the target group temperature and the orange line showing the percentage of heating element power applied to get there and to maintain the best temperature.
Next I focus on an extraction. During the extraction, hot water from the boiler flows in, the group reaches its optimal temperature of 93ºC towards the end of the extraction and the heating element stays off for a few minutes to let the group cool down to the situation before the extraction.
![]()
In close up:
![]()
So next time the blue line will be gone.
I will visit Tije to see if he can make me a secure connection for the Brew group Temperature probe. This is needed to make the system robust. Until now I had the probe fastened to the group with a piece of copper tape that's mostly used by builders of electric guitars to shield the internal wires from any interference. If this probe would accidentally come loose, the PXG4 would switch on max power to get the probe hot, but it would fail and overheat the boiler.
---
Related posts:
http://kostverlorenvaart.blogspot.nl/2015/01/la-pavoni-brew-group-temp-control.html
http://kostverlorenvaart.blogspot.nl/2015/01/plotting-pavoni-pulse.html
http://kostverlorenvaart.blogspot.nl/2015/01/time-to-pid-pavoni.html
http://kostverlorenvaart.blogspot.nl/2015/01/wiring-la-pavoni-for-fuji-pxg-4.html
I decided it would be best if I could warm up the machine using the pressostat because it is very good at starting up as fast as possible while keeping the pressure inside the boiler at a modest level.
Once the machine is almost on operational pressure & temperature, the PXG4 could take over and make sure the brew head reaches its ideal temperature and stays there too.
Thinking this through, it struck me how very convenient it is that at start up, the pressostat is ON, whereas the Solid State Relay of the PXG4 box is OFF as long as the internal program has not been started.
So the PXG4 can be ON and helping me monitor the temperature, but it will not start controlling the system until I press the button that fires up the program in its memory.
If I set the pressostat to stop heating the machine at a pressure that matches a boiler temperature close to 110ºC, I can start the PXG4 program and the PXG4 will take over control, switching the heater ON and OFF as much as is needed to reach and maintain the correct brew head temperature.
This will get the machine the best of both worlds. Not a PID replacing a P-stat, but P-stat and PID working together, each in their own best area.
I also moved the Boiler Temperature probe from below the boiler to the outside, at the back of the boiler. Below the boiler seemed a great spot earlier on but it is so close to the heating element that it does not "see" the general temperature changes in the boiler water very well.
After today I will leave off the Boiler Temperature probe altogether. I want to avoid turning the La Pavoni into a Xmas tree of gadgets and wires. More wires facilitate more tripping accidents later on, and more parts that can fail.
And also, by now I feel I know enough about the boiler temperature. It goes up and down but that's fine as long as the brew head temperature remains straight as an arrow. That means my extraction temperature will be stable as well.
In the graphs below you can still see the Boiler Temperature results.

The pressostat kindly warms up the machine here, the boiler warming up in a fairly straight line. After reaching the boiling point of 100ºC I close the steam wand as soon as serious drops of water spit out and steam follows. I also do a short flush of the group to help heating it up. After that the machine idles with the group around 75ºC and the p-stat cycling, switching the element on and off .
After 12 minutes I push the start button of the PXG4. It has been on, but not in control until then, just passing on information about the group head temperature and the inactive SSR. As soon as the PXG4 drives the machine, you can see the red line showing the target group temperature and the orange line showing the percentage of heating element power applied to get there and to maintain the best temperature.
Next I focus on an extraction. During the extraction, hot water from the boiler flows in, the group reaches its optimal temperature of 93ºC towards the end of the extraction and the heating element stays off for a few minutes to let the group cool down to the situation before the extraction.

In close up:

So next time the blue line will be gone.
I will visit Tije to see if he can make me a secure connection for the Brew group Temperature probe. This is needed to make the system robust. Until now I had the probe fastened to the group with a piece of copper tape that's mostly used by builders of electric guitars to shield the internal wires from any interference. If this probe would accidentally come loose, the PXG4 would switch on max power to get the probe hot, but it would fail and overheat the boiler.
---
Related posts:
http://kostverlorenvaart.blogspot.nl/2015/01/la-pavoni-brew-group-temp-control.html
http://kostverlorenvaart.blogspot.nl/2015/01/plotting-pavoni-pulse.html
http://kostverlorenvaart.blogspot.nl/2015/01/time-to-pid-pavoni.html
http://kostverlorenvaart.blogspot.nl/2015/01/wiring-la-pavoni-for-fuji-pxg-4.html
↧
Hey look who's on Saudi Arabian tv!
It is Wa'il!
(and my right hand for a moment)

↧
↧
Finished Pavoni & Fuji PXG4 pid: Probe Inside the Ring
At the end of the previous blog about the pressostat and PID working together, I mentioned that I would like to clean up the xmas tree of wires and have as few cables and probes as possible to visually disturb the classic design of the La Pavoni.
Getting rid of the probe that was fastened with copper tape to the top of the brew group was a priority. I wanted to hide a new probe in the cooling fin as close as possible to the brew group.
This morning I asked Tije if he could do that. He would need to drill a straight hole of 3mm diameter in the 4mm inner ring of the cooling fin that sits as a tight clamp around the brew group.
Always the optimist, Tije set to work:
![]()
First, Tije made a piece of aluminum to fit the inside of the ring. Drilling a thin hole straight through the curved aluminum, if possible tangentially going through the inside of the ring to touch the brew head directly, you need the support of the temporary inside piece.
At home, I first measured the temperature from the probe inside the ring when the probe on top of the group was at the designed 86ºC. That turned out to be 78ºC. Then I removed the top probe and had only the new 'hidden' probe to work with.
From the back of the cooling fin, just one probe cable goes to the controller.
The La Pavoni machine has been expanded and enhanced in stability, but it is not turned into a jukebox with lots of extra lights and dials. Just the little wire going from the back of the cooling ring down to the cable that connects to the external control box. The La Pavoni could even work with just the internal pressostat but for best extraction stability connecting the controller is a welcome extra feature.
Below, you can see the graph of the group temperature probe as the PXG4 is doing its auto-tune to determine the best settings of the internal P, I and D variables. Switching on the heating element for a full minute, the PID traces the delay and proportion of the results, repeats this once more 10 minutes later and then, after another 15 minutes of calculations, it has decided what's the best strategy to keep the group stable as measured from the new vantage point.
During testing with both probes active, I noticed that changes in the room, like a big window opened wide, or me blowing air past the group, change the group temperature, up to a few degrees and if this is a new situation that lasts longer than a few moments, the PID reacts and compensates. I think this is an advantage over PIDs that merely keep the boiler at a specific temperature, especially for a machine with a relatively small brew group as the La Pavoni. I expect that bigger professional brew groups with their much heavier weight keep themselves stable more easily.
![]()
I pulled two espresso's. The brew group probe showed a minor blip of two degrees Celsius and the PID guided it back to idle temperature.
Idling, the group temp as seen by the probe is between 77.8ºC and 78.2ºC
![]()
I think this La Pavoni PID & P-stat project is finished.
Thanks Wa'il, Tije, Marko and the Fuji team France for your help and suggestions!!
Related posts:
http://kostverlorenvaart.blogspot.nl/2015/01/la-pavoni-fuji-pxg4-pid-and-pressostat.html
http://kostverlorenvaart.blogspot.nl/2015/01/la-pavoni-brew-group-temp-control.html
http://kostverlorenvaart.blogspot.nl/2015/01/plotting-pavoni-pulse.html
http://kostverlorenvaart.blogspot.nl/2015/01/time-to-pid-pavoni.html
http://kostverlorenvaart.blogspot.nl/2015/01/wiring-la-pavoni-for-fuji-pxg-4.html
Getting rid of the probe that was fastened with copper tape to the top of the brew group was a priority. I wanted to hide a new probe in the cooling fin as close as possible to the brew group.
This morning I asked Tije if he could do that. He would need to drill a straight hole of 3mm diameter in the 4mm inner ring of the cooling fin that sits as a tight clamp around the brew group.
Always the optimist, Tije set to work:

First, Tije made a piece of aluminum to fit the inside of the ring. Drilling a thin hole straight through the curved aluminum, if possible tangentially going through the inside of the ring to touch the brew head directly, you need the support of the temporary inside piece.
 |
| Aligning the 3mm drill |
 |
| Tije at work |
 |
| Finished! Perfect. |
 |
| You have to look to find the 'hidden' probe |
 |
| Much cleaner sight, just the La Pavoni and the external controller |
Below, you can see the graph of the group temperature probe as the PXG4 is doing its auto-tune to determine the best settings of the internal P, I and D variables. Switching on the heating element for a full minute, the PID traces the delay and proportion of the results, repeats this once more 10 minutes later and then, after another 15 minutes of calculations, it has decided what's the best strategy to keep the group stable as measured from the new vantage point.
During testing with both probes active, I noticed that changes in the room, like a big window opened wide, or me blowing air past the group, change the group temperature, up to a few degrees and if this is a new situation that lasts longer than a few moments, the PID reacts and compensates. I think this is an advantage over PIDs that merely keep the boiler at a specific temperature, especially for a machine with a relatively small brew group as the La Pavoni. I expect that bigger professional brew groups with their much heavier weight keep themselves stable more easily.

I pulled two espresso's. The brew group probe showed a minor blip of two degrees Celsius and the PID guided it back to idle temperature.
Idling, the group temp as seen by the probe is between 77.8ºC and 78.2ºC

I think this La Pavoni PID & P-stat project is finished.
Thanks Wa'il, Tije, Marko and the Fuji team France for your help and suggestions!!
Related posts:
http://kostverlorenvaart.blogspot.nl/2015/01/la-pavoni-fuji-pxg4-pid-and-pressostat.html
http://kostverlorenvaart.blogspot.nl/2015/01/la-pavoni-brew-group-temp-control.html
http://kostverlorenvaart.blogspot.nl/2015/01/plotting-pavoni-pulse.html
http://kostverlorenvaart.blogspot.nl/2015/01/time-to-pid-pavoni.html
http://kostverlorenvaart.blogspot.nl/2015/01/wiring-la-pavoni-for-fuji-pxg-4.html
↧
Coffee preparation in Bad Kohlgrub
When making a short trip it's especially enjoyable to take the time to prepare a nice cup of coffee because it's often those simple pleasures that enhance a day the most.
![]()

↧
Mount Hörnle: hike up, cable down

The steep path up with a gradient of 20º taking me from 830m above sea level to 1440m proved enough of a challenge for me to decide to take the cable lift down instead of hiking down on the other side of the mountain, which was a designated ride for fast sleighs anyway.
The views were magnificent.


 |
| Altitude |


 |
| Was surprised to read the high temps but turned out the temp tag was snug against my back for 3km |


 |
| Skipped the hike up to the highest point |
 |
| Ready to go back |

 |
| Back in the village |
↧